Playset Plans: How to Build a Swing Set

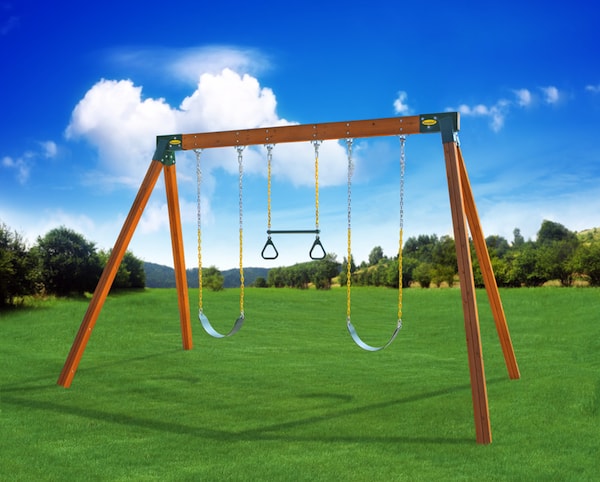
Searching for playset plans can be a challenging task. With so many different swing set models on the market, the options may seem overwhelming. We’re writing today to give you the same advice we’ve given customers for 24 years: Keep it simple. When it comes to building a DIY swing set, we always suggest the Classic A-Frame Cedar Swing Set (available as a hardware kit here). The design is simple, and so is the construction. Plus, you can never go wrong with a pair of traditional sling swings and a gym ring/trapeze bar accessory in the backyard.
First, we recommend selecting an appropriate space for the swing set. The playset plans for the Classic A-Frame specify a finished product that is about 12 feet wide, 8 feet tall and 8 feet deep. It should be installed on fairly level ground, and there should be about six feet of clearance from obstructions. Be sure to also select a soft surface, such as rubber mulch or a plush lawn.
A-Frame Playset Plans Material List
Lumber
- One (1) 4’x6’x10′
- Four (4) 4’x4’x8′
Hardware and Accessories
-
- Twelve (12) 3/8″ x 6.5″ hex bolts, with twenty-four (24) 3/8″ washers and 12 lock nuts
- Thirty-six (36) 5/16 x 3″ lag bolts, with thirty-six (36) 5/16″ washers
- Two (2) swing set support brackets (try our patent-pending Easy 1-2-3 A-Frame Swing Set Bracket)
- Four (4) anchor stakes
- Two (2) sling swings
- One (1) gym ring trapeze bar combo swing
- Six (6) ductile swing hangers
- Six (6) snap hooks
A-Frame Playset Plans Tool List
- 1/2″ standard socket, 3/4″ standard socket
- Standard socket wrench, open-end wrench
- Electric drill
- 1/4″ pilot drill bit, 5/16″ drill bit
- 2-pound hammer, claw hammer
- Tape measure
- Step ladder
- Safety glasses
A Few Important Notes
Before you begin assembling, we want to remind you of two critical steps. First, drilling pilot holes is essential in order to minimize splitting of the lumber. Second, we recommend always installing a washer before driving in a lag bolt.
Additionally, if you plan to use our Easy 1-2-3 A-Frame Swing Set Bracket, keep in mind that the product is designed for kiln-dried wood. We strongly caution against forcing the wood into the bracket. The lumber should slide in easily, and the fit should be snug. If you find your lumber is too large, try planning down to achieve a comfortable fit.
Instructions: Beginning Steps
-
-
- Install the ductile swing hangers. When you purchase a complete swing set from Eastern Jungle Gym, the holes in the lumber are pre-drilled. But if your swing set is a true DIY project, this likely won’t be the case. That means you will have to measure and mark the lumber to ensure the swing hangers are properly spaced. To do this, lay the swing beam (the 4’x6’x10′ piece of lumber) on the ground and start at one end of the lumber. Place the center of the first hanger 18 inches in, on center (OC). Go another 18 inches OC for the second hanger, then 12 inches OC for the third. Measure another 18 inches OC for the fourth hanger, and from there, measure 12 inches OC for the fifth. Finally, measure 18 more inches OC for the last hanger. This should leave you with another 18 inches from the center of the swing hanger to the end of the beam. You should have a total of 12 holes, or six sets of two holes, to accommodate your three swings. The diagram below provides an illustration of the spacing, and may be enlarged by clicking.
 Once you have marked the lumber, pilot drill the first set of on-center hanger holes using the electric drill and 5/16″ drill bit. Next, insert bolts, with washers, from what will be the top of the swing beam. It may be helpful to turn the wood on its side for this process, as shown in the video below. Once the bolts and washers are in, slide the hanger over the bolts and add washers. Finally, screw on lock nuts and washers, and tighten using an open-end wrench. Repeat for the remaining hangers.
- Install the ductile swing hangers. When you purchase a complete swing set from Eastern Jungle Gym, the holes in the lumber are pre-drilled. But if your swing set is a true DIY project, this likely won’t be the case. That means you will have to measure and mark the lumber to ensure the swing hangers are properly spaced. To do this, lay the swing beam (the 4’x6’x10′ piece of lumber) on the ground and start at one end of the lumber. Place the center of the first hanger 18 inches in, on center (OC). Go another 18 inches OC for the second hanger, then 12 inches OC for the third. Measure another 18 inches OC for the fourth hanger, and from there, measure 12 inches OC for the fifth. Finally, measure 18 more inches OC for the last hanger. This should leave you with another 18 inches from the center of the swing hanger to the end of the beam. You should have a total of 12 holes, or six sets of two holes, to accommodate your three swings. The diagram below provides an illustration of the spacing, and may be enlarged by clicking.
-
Adding Brackets and Erecting the Swing Set
-
- The next step is to install the swing set brackets. Position the beam so the newly installed hangers are facing upward (the opposite of the way they will rest once the playset is fully assembled). Slide one of the brackets onto the end of the lumber until it is flush with the wood. Pilot drill in the designated locations (our brackets come pre-drilled, which makes your life much easier), using the 1/4″ pilot drill bit. Then, use one lag bolt and washer per bracket hole to fasten the bracket. Do the same on the reverse side of the bracket, and then repeat the entire process on the other end of the beam.
- The side supports must be fastened next. Your remaining lumber (four 4x4x8′ timbers) will make up the side supports. Install these using the same method we provided for attaching the beam to the bracket.
- It’s time to erect the playset. Once each of the brackets have been secured to all three pieces of lumber, you are ready to stand up the unit. If you’ve been working alone thus far, you’ll need to find another adult to assist with this step.
- The next step is to install the swing set brackets. Position the beam so the newly installed hangers are facing upward (the opposite of the way they will rest once the playset is fully assembled). Slide one of the brackets onto the end of the lumber until it is flush with the wood. Pilot drill in the designated locations (our brackets come pre-drilled, which makes your life much easier), using the 1/4″ pilot drill bit. Then, use one lag bolt and washer per bracket hole to fasten the bracket. Do the same on the reverse side of the bracket, and then repeat the entire process on the other end of the beam.
Finishing Touches
-
- Hang the swings. We are nearing the end of our playset plans, which means it’s time to put up the swings! Use the snap hooks to attach the swing chains to the ductile swing hangers. We typically place the gym ring trapeze bar combo in the center position, but arrangement preferences vary.
- Secure your swing set with anchor stakes. If you are using our anchor stakes, you will want to position the anchor at an angle and insert it into the ground next to the beam. You can accomplish this by using the hammer cited in the tool list above. Once the stake is in the ground, pound down the anchor until you are able to secure the anchor washer to the bottom of the post with a lag bolt. If you have purchased your stakes elsewhere, we recommend reviewing and following the specific directions for that product.
Congrats!
Now that you’ve reached the end of this blog, we want to congratulate you on successfully completing your project! We hope these playset plans have been helpful and we welcome your questions.


